By contrast, if you landed on this post from somewhere else, a little background is in order. Vector has a hydraulic steering system, with most of the components coming from the Canadian firm Jastram. That steering system includes a pair of big hydraulic rams that move the tiller arms and thus the rudder, two manual helm pumps operated by big 30"-diameter "destroyer-style" helm wheels, and an electric helm pump connected to an electronic autopilot. There are also two rudder feedback senders, one made by Jastram that drives an analog gauge on the helm console, and a second that is part of the autopilot system.
The autopilot is a Simrad unit common on boats of Vector's era, developed by Robertson, whom Simrad purchased before themselves being absorbed into Navico. Other than some water intrusion into the flybridge control head, the Simrad system has worked reasonably well since we got the boat, and we're quite happy with it. The main control unit, which nowadays would be called a computer but when this system was released was called a "junction box," a J300X model, has several output terminals to drive a variety of electric helm pumps, although Simrad also sold their own version. We have two control heads for the system, an AP20 in the pilothouse and the smaller AP22 on the flybridge.
There's really nothing at all wrong with the Simrad part of the system. It's an older unit and sometimes it misses or misconstrues NMEA inputs from the chartplotter computer, which tells it where to go in navigation mode, and when such an event starts to send us off in an odd direction we'll often say "go home, Otto, you're drunk." Typically, disengaging and re-engaging navigation mode is all that is required to get past these rare glitches.
The Jastram pump has also run more or less flawlessly until a week ago, when it quit briefly on our way into the Alligator river, and then again permanently while crossing the Pamlico the following day. Given its complexity, there are quite a number of ways in which it can fail, and several of those are electrical or electronic in nature. My first impulse was to start taking apart its integral electrical control box and put a meter on the various signals from the autopilot control unit to see if the commands were even coming through, or if either the thermal circuit breaker or the motor solenoid was not passing power through to the motor.

Motor end cap, full of carbon dust. You can see bits of the commutator in the dust.
That diagnosis revealed in short order that power was going to the motor but the motor was not turning, and removing the motor end cap, which can be done with the motor still attached, quickly revealed why: the commutator had disintegrated. The end cap was nearly packed full of dust from the carbon brushes, and I found bits of the commutator in the dust. Reluctantly, we diverted our course and put into port, hand steering for some eight hours or so.

The commutator end of the armature, still in the motor housing. You can see in-place commutator pads on the left, and missing spots on the right. And more dust.
After deciding to make port in New Bern, NC, I called three different electric motor repair places there. Upon explaining the problem, each told me the motor was not really repairable and would need to be replaced. Each also told me that without the specifications, they could not match anything up to provide a replacement motor. Thus started a lengthy Internet search for either a replacement motor, or an entire autopilot pump.
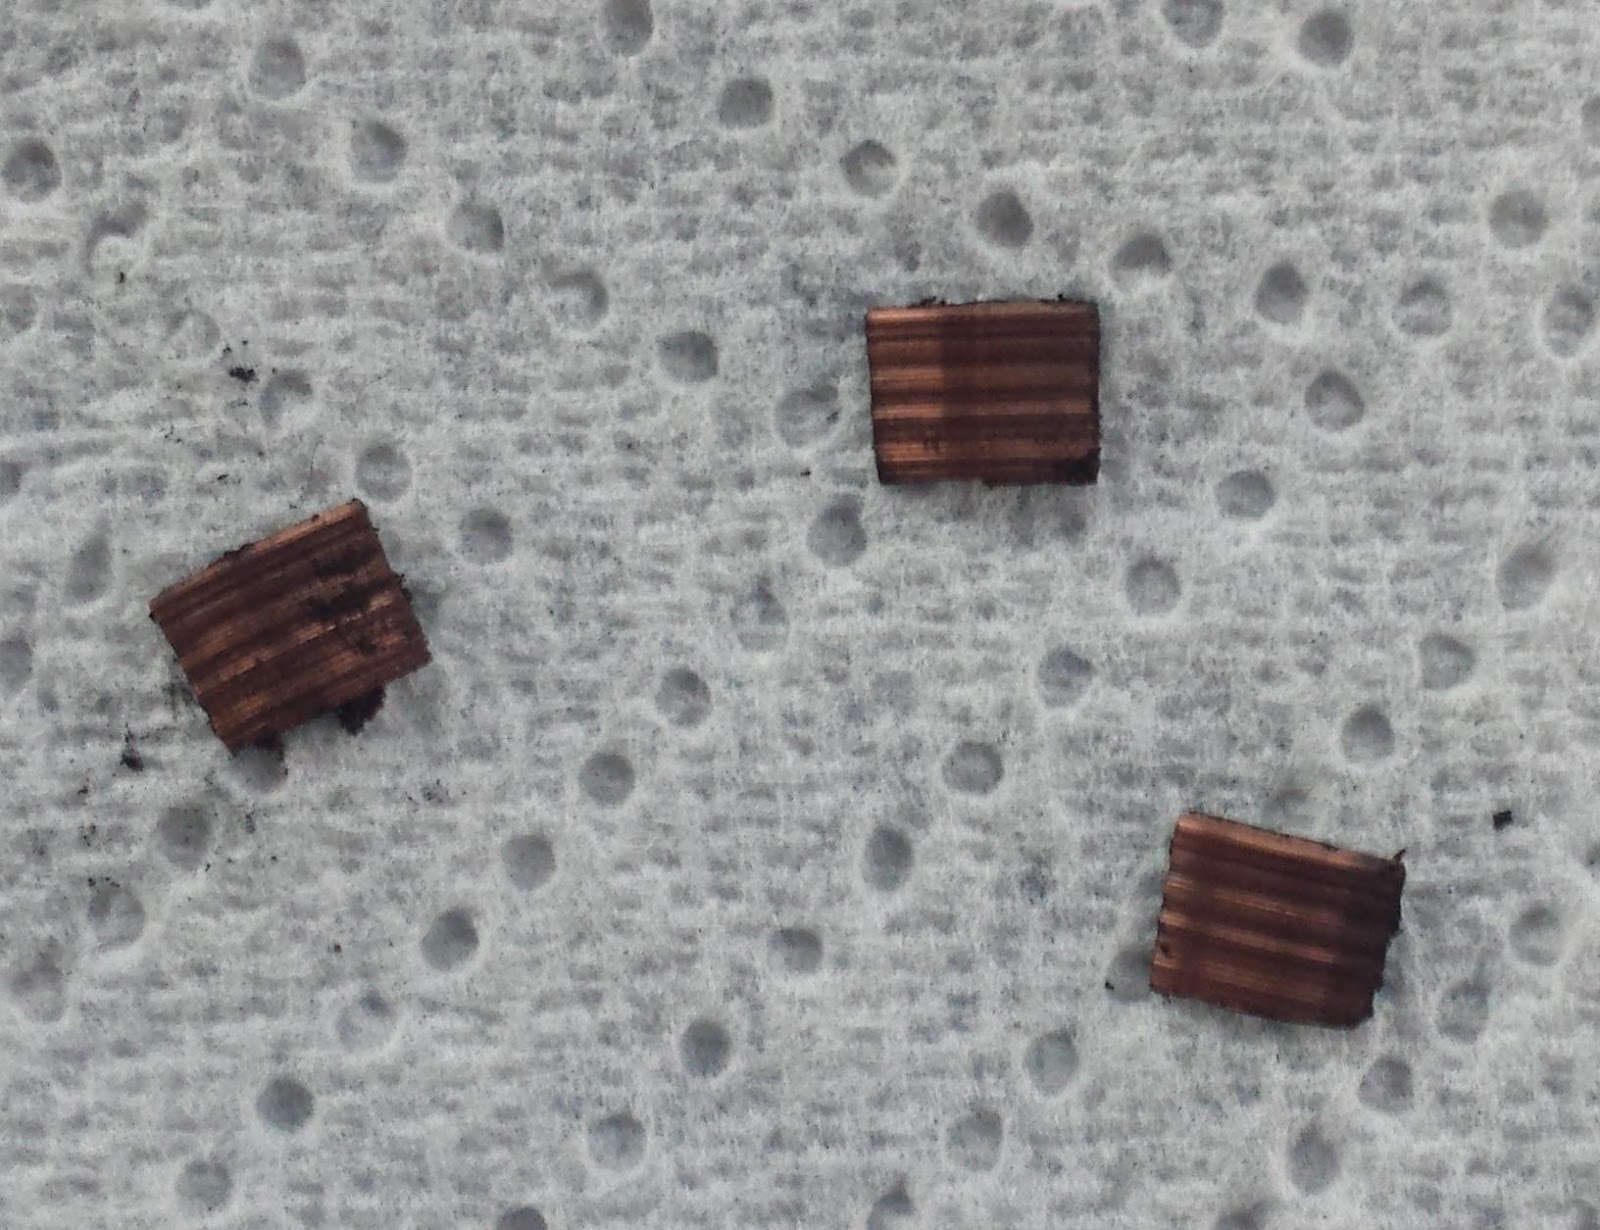
Some of the broken bits of commutator. No way to reattach these.
In the process of trying to source a motor and/or a whole pump, I learned a great deal about autopilot pumps in general and ours in particular. Now that I know it, it all makes perfect sense, but it's not something I had to think about before.
Our pump is a constant-running pump with a "shuttle valve" or "pilot valve" attached. When the autopilot is engaged, the pump runs continuously and in one direction only. Absent any commands, the fluid leaves the pump and immediately returns via a U-turn in the center of the pilot valve. When the autopilot commands right or left rudder, the shuttle moves in a corresponding direction to send the fluid into the helm lines leading to the ram cylinders in one direction or the other; from the point of view of the valve, this is either a "straight through" or "crossed over" arrangement of the output.

The cover plate from the shuttle valve, showing the fluid flow diagram.
When I started looking into replacement autopilot pumps, the vast majority on the market were not constant-running pumps with shuttle valves, but, rather, reversible pumps. The pump is plumbed directly to the steering lines, and the motor is operated in one direction or the other, by changing polarity, to move the rudder, which stops when there is no power sent to the pump at all. Unsurprisingly, these types of pumps, being much simpler in design, were considerably less expensive than the constant-running types.
Upon further investigation I learned that autopilot pumps, while often sold in catalogs based on boat length, are really sized instead by the volume of the steering ram(s). When you think about it, this makes perfect sense: the pump needs to be able to take the rudder from full left to full right in a set amount of time; 20 seconds is a typical number for automatic operation; half that or less might be required if "manual" steering will be done by means of a follow-up lever. How long it takes the pump to move the rudder is a function of the flow rate of the pump and the volume of the steering ram(s).
Vector has two steering rams with a capacity of 300cc apiece. That means that 600cc must flow through the system to move the rudder from full lock right to full lock left or vice versa. The Jastram pump installed with the system is a 3 liter/minute pump, or a lock-to-lock time of about 20 seconds. By contrast, the largest reversible pump I found, at around $900, was rated for 2 liters/minute, and pumps in the $500 range were more like 1 liter/minute. None of those was going to cut it with our system, and 3 liter/minute pumps, all of which are the constant running type with shuttle valve, are in the $3,000 range. Learning this gave me great incentive to repair the pump we already had.
Somewhere in the process of this research, I learned that a now-discontinued reversible pump, made by Accu-Steer, is the underpinning of our pump. Jastram partnered with Accu-Steer and mated a valve block and a Vickers shuttle valve to their HRP-75 pump to create the Jastram HPU-180 pump, then hard-wired the motor to run in a single, continuous direction. I was able to find a replacement HRP-75 on eBay (which I later purchased as a spare; we should have it in a couple of weeks) and deduce some things about the motor from a partial nameplate in the listing photo.
Between that, the physical characteristics of the existing motor and pump, and the limited specs in my owner manual, I guessed that a 1/7-HP rated motor turning around 1,700 rpm at 12 volts would be sufficient for the task. Motors of about this specification, but with square rather than round end-plates, are available on short notice from Grainger for about $270 or McMaster-Carr for about $190. In either case, I'd have to modify the mounts, but, more importantly, find a way to couple their 1/2" output shafts to the pump's 3/8" input coupling.
After hunting around for quite some time, I came across this motor available on Amazon for just $50 with free two-day Prime shipping. It's rated at 3,800rpm at 24v, or half that at 12v, with the required 150-watt continuous rating. It's significantly smaller physically than the motor it's replacing, which gave me pause, and I knew I'd have to find some way to mount it with its smaller end-cap, as well as adapt its 5/16" output shaft to the 3/8" pump input.

Old motor at left with new one at right. Note the machined lip on the old motor and the four mounting holes on the end cap; in this photo the new motor has already been drilled and tapped for the same mount and "machined" down to the same OD.
With a replacement pump/motor assembly on tap via eBay and nothing to lose, I ordered the motor on Amazon with a delivery for Tuesday afternoon. As soon as it arrived, I set to work. After a quick test to ensure the motor spun properly in both directions, I started on the output shaft adapter. This started out as a length of 3/8" OD, ~5/16 ID copper tubing, less than a dollar for 3" worth at the hardware store in town.
It's impossible to cut a clean end on soft copper tubing, so I had to run my 5/6" drill bit through the tube a few times to get the motor shaft to fit. This after over an hour of fiddling to remove the belt pulley that came with the motor, which, despite being putatively retained by a simple clip ring, was effectively press-welded to the shaft. (I ended up hacksawing it in pieces and then running the motor against a bastard file until the stupid thing fell off.)

Lovejoy-type coupler with the home-made copper reducer fitting inserted.
Once I had the tubing pressed over the shaft on a close fit, I spun the motor up, tubing and all, to cut the tubing to length against a sharp file, then spun it some more against first a file and then an emery cloth until the tubing fit snugly inside the 3/8" Lovejoy-style coupling (actually a Martin brand coupling) that came off the old motor. I then drilled a small hole in the tubing for the set-screw on the coupling to pass through and engage the flat on the new shaft.
With the tubing and Martin coupler in place, I held the motor up against the mating coupler on the pump by hand, while Louise operated the autopilot's non-follow-up mode to move the rudder from full left to full right and back again. I expected to have to grip the motor tightly, but was pleasantly surprised by how little torque was required to keep it in place. The little motor had no trouble moving the rudder, at least at the dock with no water flow past it.

New motor with jaw coupling installed, ready for installation.
That accomplished, the next step was to mate the motor to the pump in some sort of permanent way. The previous motor was affixed with four 10-32 machine screws near the outboard edge of the end cap. The new motor was drilled and tapped for three 10-32 screws a good deal closer to center. Ideally I would be able to use these mounting holes, but the connection to the pump involved a flanged tube wherein the tube portion was very nearly on top of those threaded holes. There was no way to drill the flange for the new bolt holes or get bolts in to them.
Instead I opted to disassemble the brand new motor so that I had the end cap as a loose part, then drill and tap the end cap for the four 10-32 bolts in their original locations. The casting of the inside portion of the end cap made that nearly impossible, and I managed to get two good holes and two somewhat oblong ones, but with usable 10-32 threads nonetheless.

My hokey mounting holes, near the outboard edge of the end cap. The OEM mounting holes, closer to the spindle, are tapped into thicker ribs cast into the end cap for the purpose. I made sure that one new mounting hole, at lower right, also ended up in a thicker part of the casting.
The old motor had a machined lip on the end cap that mated with a lip on the mounting flange. The new motor's entire end cap was just a hair over the diameter of this machined lip, so I put a bolt through the spindle hole, chucked the end cap in my drill, and spun it against a file until the OD just fit inside the lip on the mounting flange. Crude, but it worked.
Once it was all in place and bolted together, we fired up the autopilot and ran the rudder in both directions several times. Other than being a bit quieter than the old motor, we could detect no real difference in performance, but, again, that's at the dock with no water flow. We knew we'd need a sea trial.
Today's cruise down the Neuse River and Adams Creek provided the first real test. It all seems to be working fine, and we made it do several hard-over turns at our normal cruising speed to be sure the new motor would not bog down. Again, other than being quieter, which I attribute to the commutator problems on the old unit, we can't tell the difference. Only time will tell if this inexpensive motor will live up to the challenge.
The new motor does not have externally accessible brushes, so if those need replacing I will need to open it up and do some soldering. But then again, the externally replaceable brushes on the old motor did no good at all -- the brushes still had plenty of meat left when the commutator self-destructed. If this motor burns up in a couple of years, I'll just buy another one for another $50. As it stands now, I have a total of about $55 invested in the repair.
I did buy a 1/2" hub Martin coupling for a few bucks, in case I need to upgrade to the aforementioned motors from either McMaster or Grainger. Those motors can be had in a day or two, so having the coupling on hand will make the swap that much quicker. And I also blew ten bucks on a package of spindle bushings to mate 1/4" shafts to 3/8" couplers, in case I need to change to a motor with a 1/4" spindle. Between the two of them, I should be able to get a workable replacement motor up and running in just a couple of days anywhere we might be, should the current hack quit working.
As I mentioned earlier, I also ordered a used take-out Accu-Steer HRP-75 pump assembly. This should have a good working motor on it as well as the swash-plate pump itself, giving me spares for most of the moving parts of the Jastram pump. The other moving part is the pilot valve, readily available from Eaton/Vickers in stock. I spent just $150 on this used pump, inclusive of shipping, and for that price I'm happy to have the spares even if I never need them.
Tomorrow we will head out into the ocean on an overnight passage, which will be the real litmus test of my repair. I have no reason to believe it will not work perfectly, but the diminutive size of the replacement motor will have me watching it closely for the next few passages.
Awesome repair job! Thanks for sharing the details. I always appreciate how you look at the whole problem - and work through the pros and cons of every available solution. I'll be very curious to see how this motor holds up in your application.
ReplyDeleteThanks for your comment. As a quick follow-up, we've been running it for a couple of weeks now, including a three-day ocean passage, and all is well, so we are going to declare victory. I'm sure this $50 motor will not last forever, but now I can just order another one if I need to, swap the end cap for the one I've pre-drilled, and slap it on.
DeleteGreat "fix" Sean, at what point in time does your brain get overloaded with all of your new input data? What an adventure!
ReplyDeleteMerry Christmas to you and Louise. Steve & Carol
Thanks, guys, and merry Christmas to you, too.
DeleteBTW, my brain was overloaded two decades ago; when new stuff comes in, something else falls out. Why I can never find my glasses, the tool I was just using, etc. :-)